> ## Documentation Index
> Fetch the complete documentation index at: https://docs.petrasecurity.com/docs/llms.txt
> Use this file to discover all available pages before exploring further.
# Remediate an Account Compromise
> Step-by-step guide for handling and remediating compromised accounts in Petra
## Overview
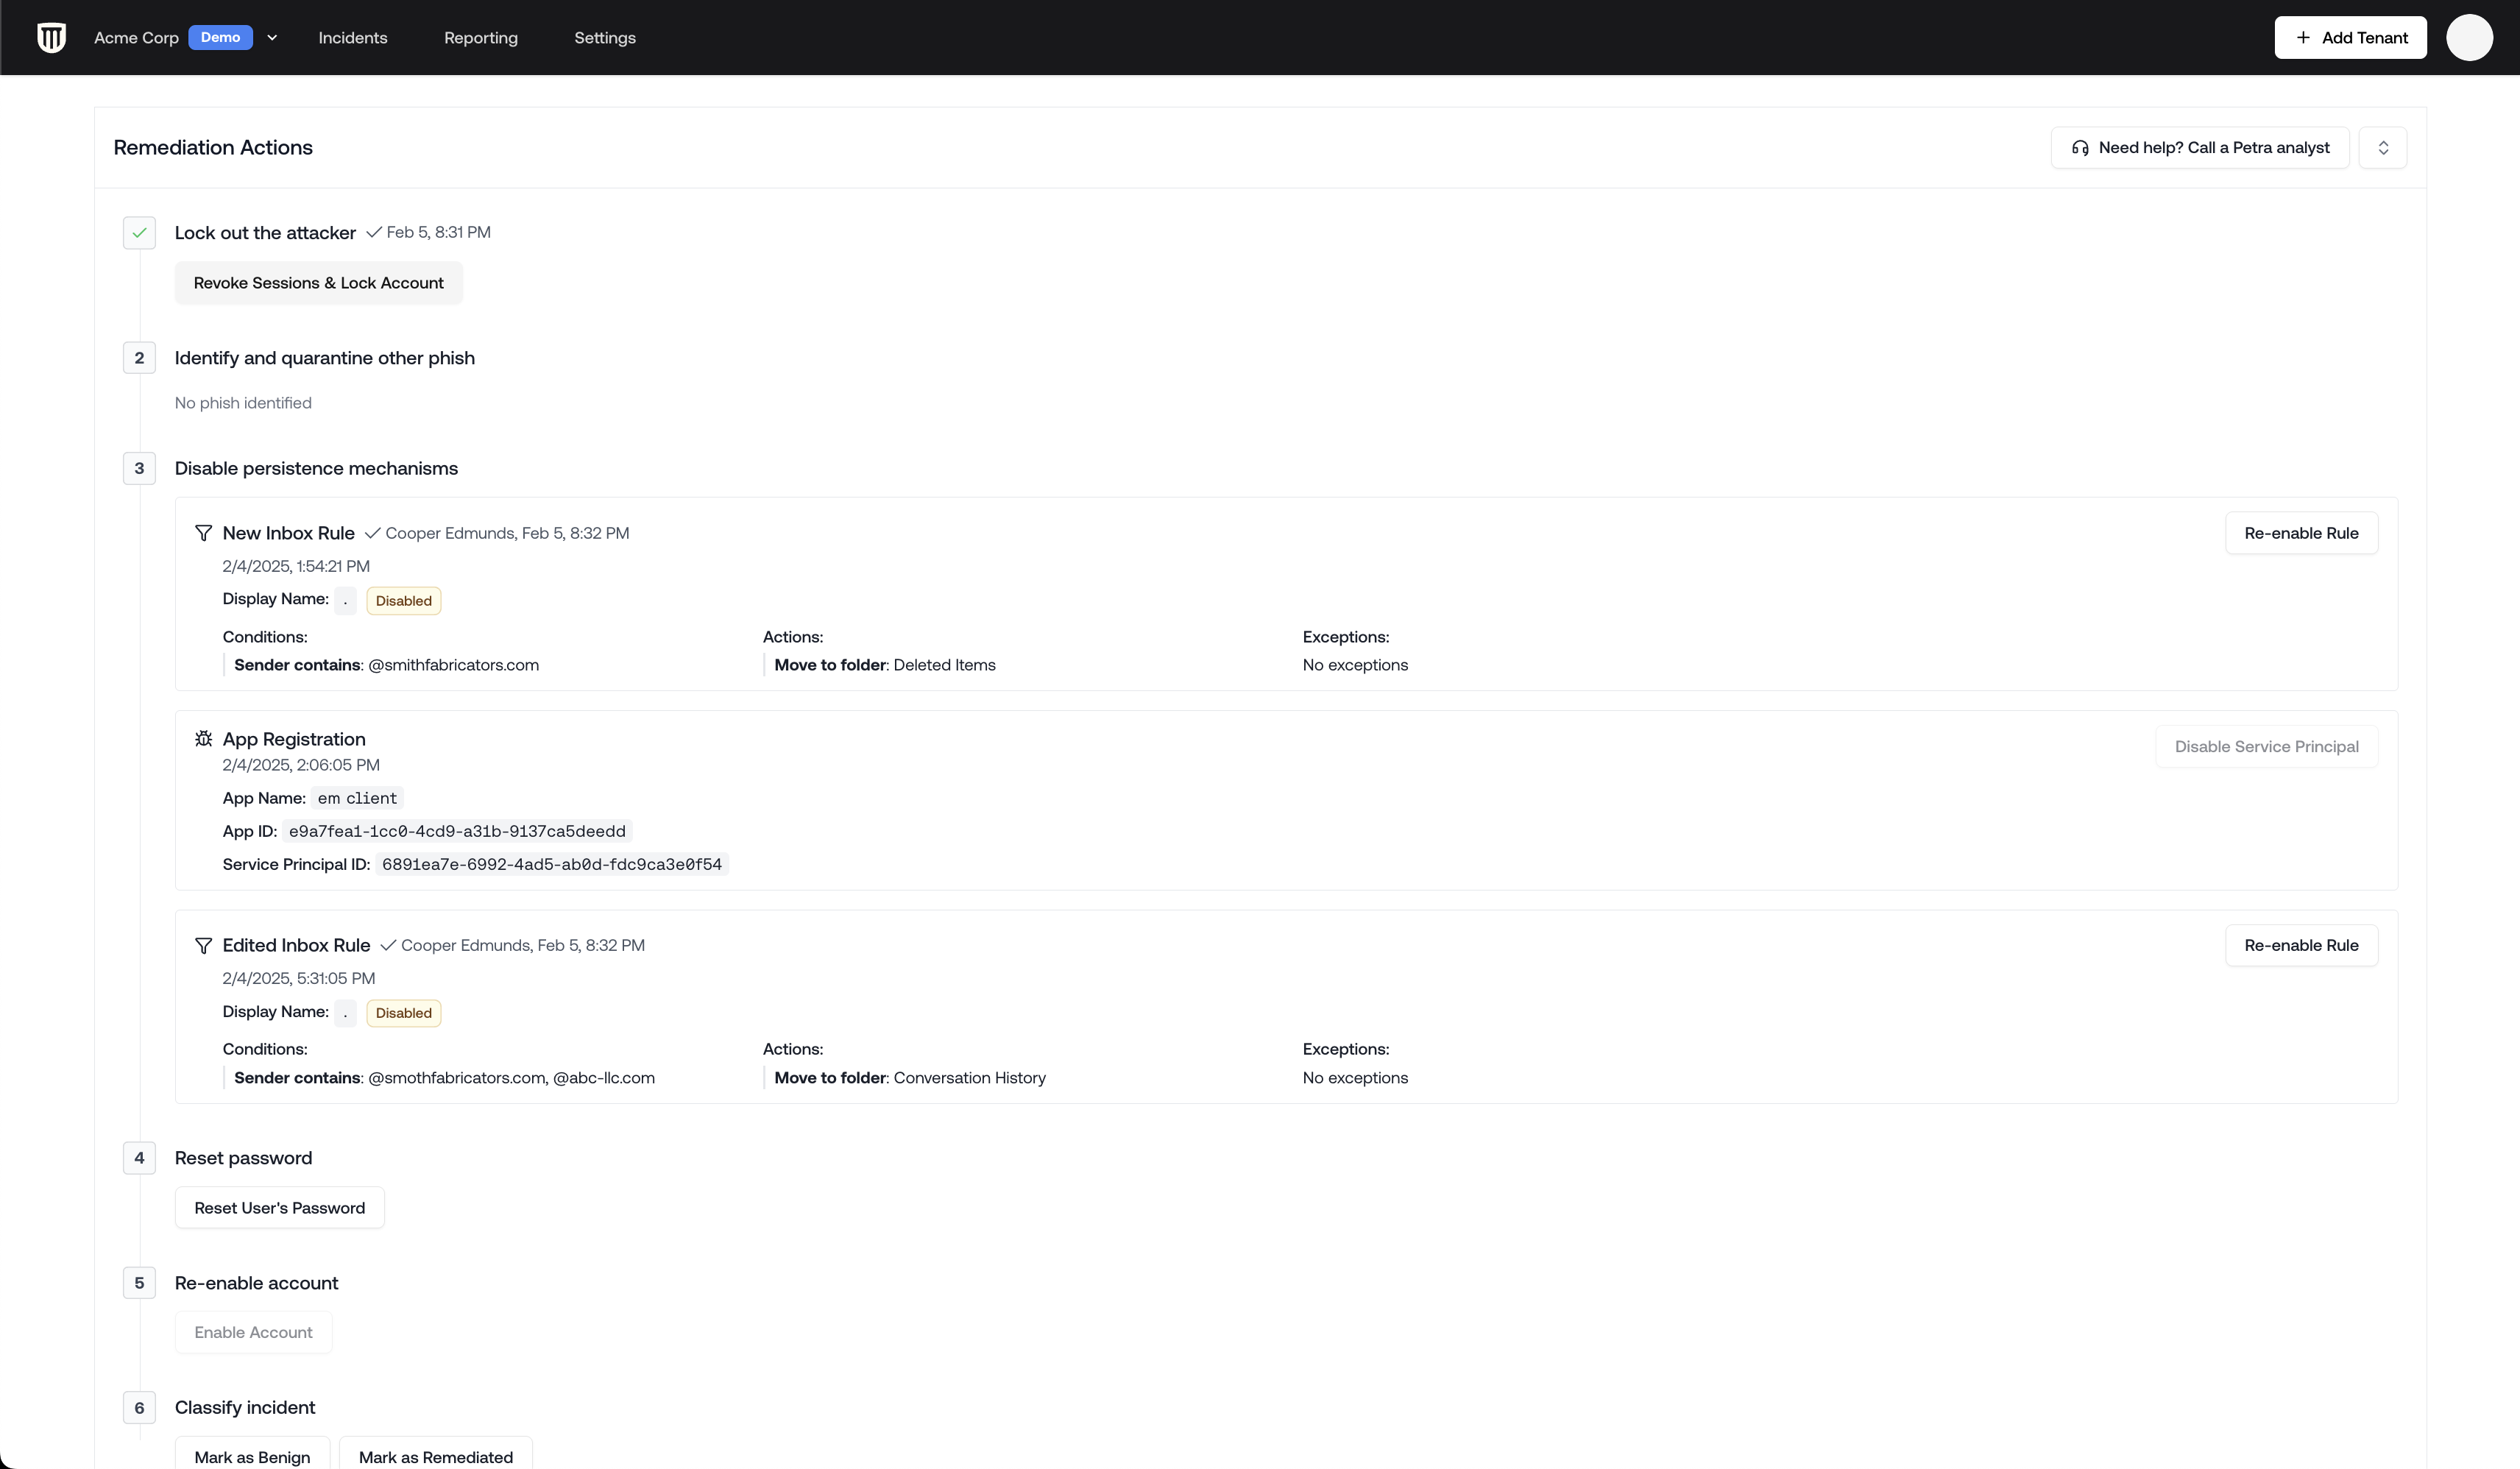
The Remediation Actions panel guides you through the 6 steps of remediating an account compromise:
1. [Revoke Sessions and Lock Account](#step-1%3A-revoke-sessions-and-lock-account)
2. [Retract Phishing Emails](#step-2%3A-retract-phishing-emails)
3. [Disable Persistence Mechanisms](#step-3%3A-disable-persistence-mechanisms)
4. [Reset Password](#step-4%3A-reset-password)
5. [Re-enable Account](#step-5%3A-re-enable-account)
6. [Mark as Remediated](#step-6%3A-mark-as-remediated)
 ### Step 1: Revoke Sessions and Lock Account
**Revoke Sessions and Lock Account** should be your first action when remediating a compromise
In the **Remediation Actions panel**, click the **Revoke Sessions and Lock Account** button to immediately:
* Terminate all active user sessions
* Lock the compromised account
* Prevent further unauthorized access
**Revoke Sessions and Lock Account** works for all account types, including on-prem synced and
hybrid accounts. For hybrid accounts, see [Hybrid and on-prem synced accounts](#hybrid-and-on-prem-synced-accounts) below for how locking works with on-prem AD, and [Password writeback for hybrid accounts](#password-writeback-for-hybrid-accounts) for how password resets interact with on-prem AD.
#### Hybrid and on-prem synced accounts
When Petra locks a compromised account in a tenant on hybrid AD, it re-locks the account if it detects the on-prem AD trying to sync the old enabled status back to Entra. If Petra detects that the account was legitimately re-enabled in on-prem AD after the incident, it releases the lock and stops re-locking the account.
For hybrid accounts, always clear a Petra lock using the **Re-enable Account** button on the incident page. Re-enabling the account on the on-prem domain controller will not clear the lock, and the account will stay disabled.
### Step 2: Retract Phishing Emails
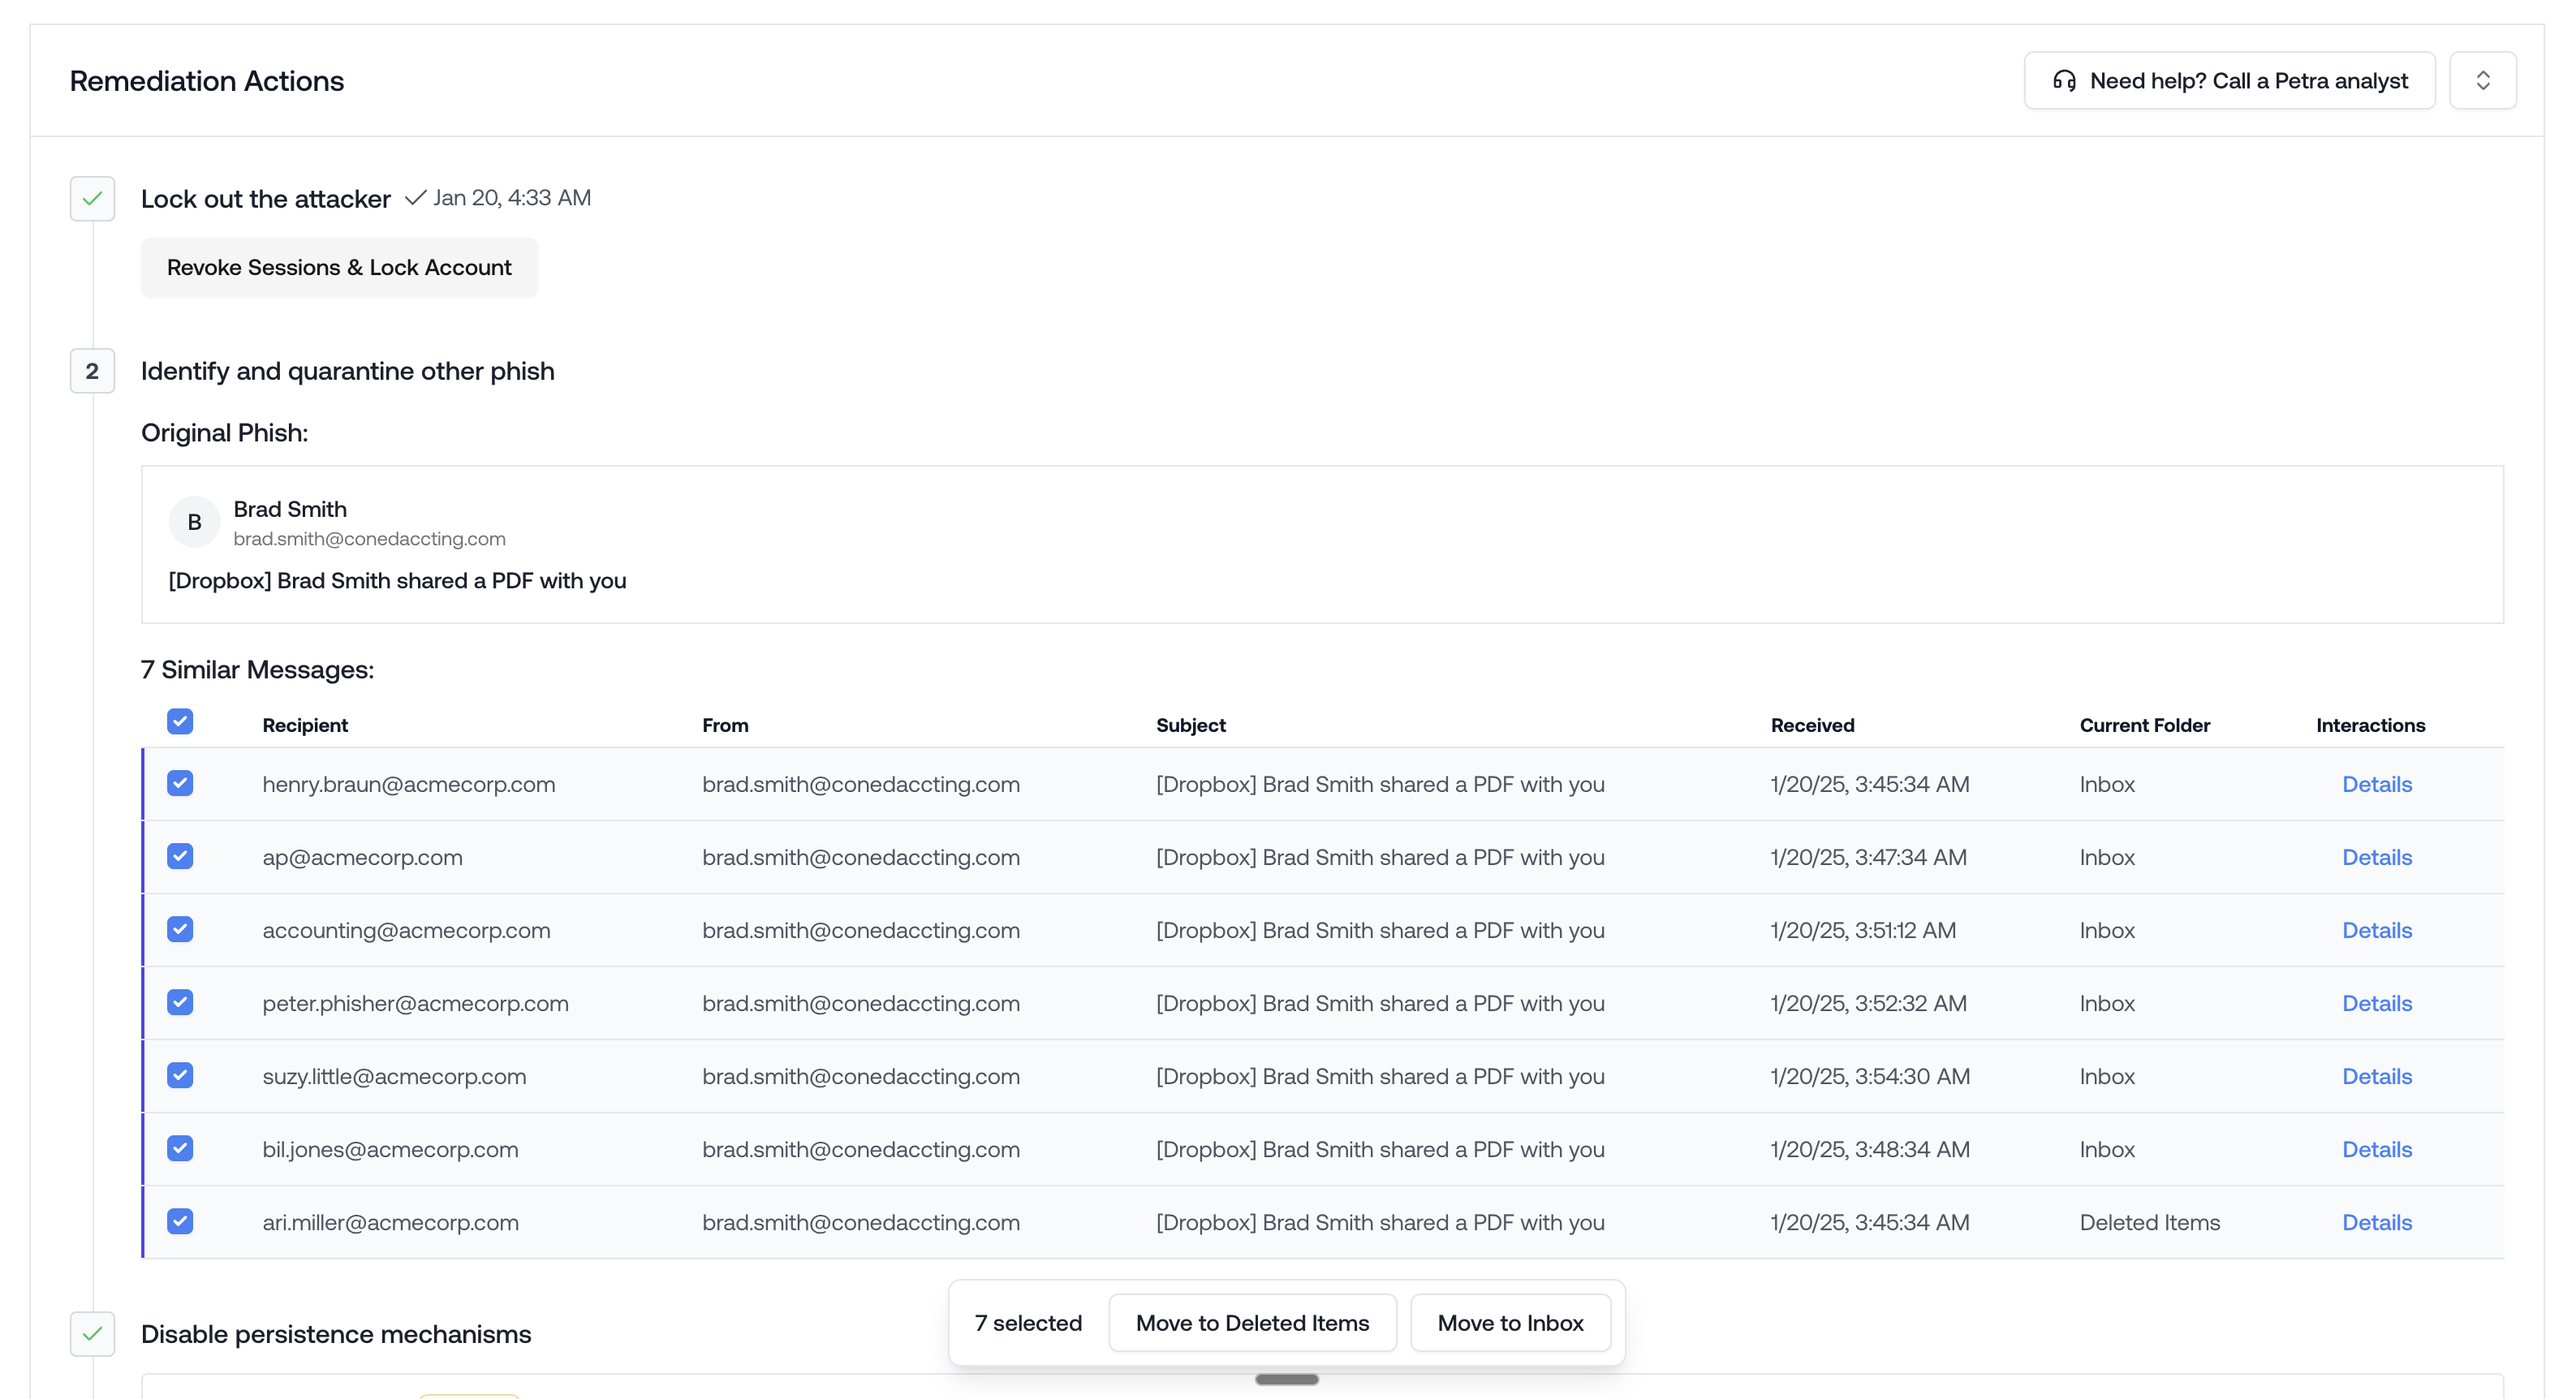
Similar phishing emails are identified automatically and can be moved to Deleted Items.
### Step 1: Revoke Sessions and Lock Account
**Revoke Sessions and Lock Account** should be your first action when remediating a compromise
In the **Remediation Actions panel**, click the **Revoke Sessions and Lock Account** button to immediately:
* Terminate all active user sessions
* Lock the compromised account
* Prevent further unauthorized access
**Revoke Sessions and Lock Account** works for all account types, including on-prem synced and
hybrid accounts. For hybrid accounts, see [Hybrid and on-prem synced accounts](#hybrid-and-on-prem-synced-accounts) below for how locking works with on-prem AD, and [Password writeback for hybrid accounts](#password-writeback-for-hybrid-accounts) for how password resets interact with on-prem AD.
#### Hybrid and on-prem synced accounts
When Petra locks a compromised account in a tenant on hybrid AD, it re-locks the account if it detects the on-prem AD trying to sync the old enabled status back to Entra. If Petra detects that the account was legitimately re-enabled in on-prem AD after the incident, it releases the lock and stops re-locking the account.
For hybrid accounts, always clear a Petra lock using the **Re-enable Account** button on the incident page. Re-enabling the account on the on-prem domain controller will not clear the lock, and the account will stay disabled.
### Step 2: Retract Phishing Emails
Similar phishing emails are identified automatically and can be moved to Deleted Items.
 #### Mark as Phish
Petra tags the phishing email on the incident automatically in most cases. When it can't, you'll need to tag it yourself so that retraction, cross-tenant search, and reporting know which email is the phish.
To tag manually: open the incident, find the suspicious email in the Exchange Logs, hover over it, and click **Mark as Phish**. The email will show a **Phish** badge next to the subject line once it's tagged.
**Mark as Phish** tags the email as the phishing email for the incident. It does not remove the email from inboxes. Use the retraction button in Step 2 to move it to Deleted Items across the tenant, or [Cross-Tenant Phish Removal](#cross-tenant-phish-retraction) for matching emails across other tenants.
#### Cross-tenant phish retraction
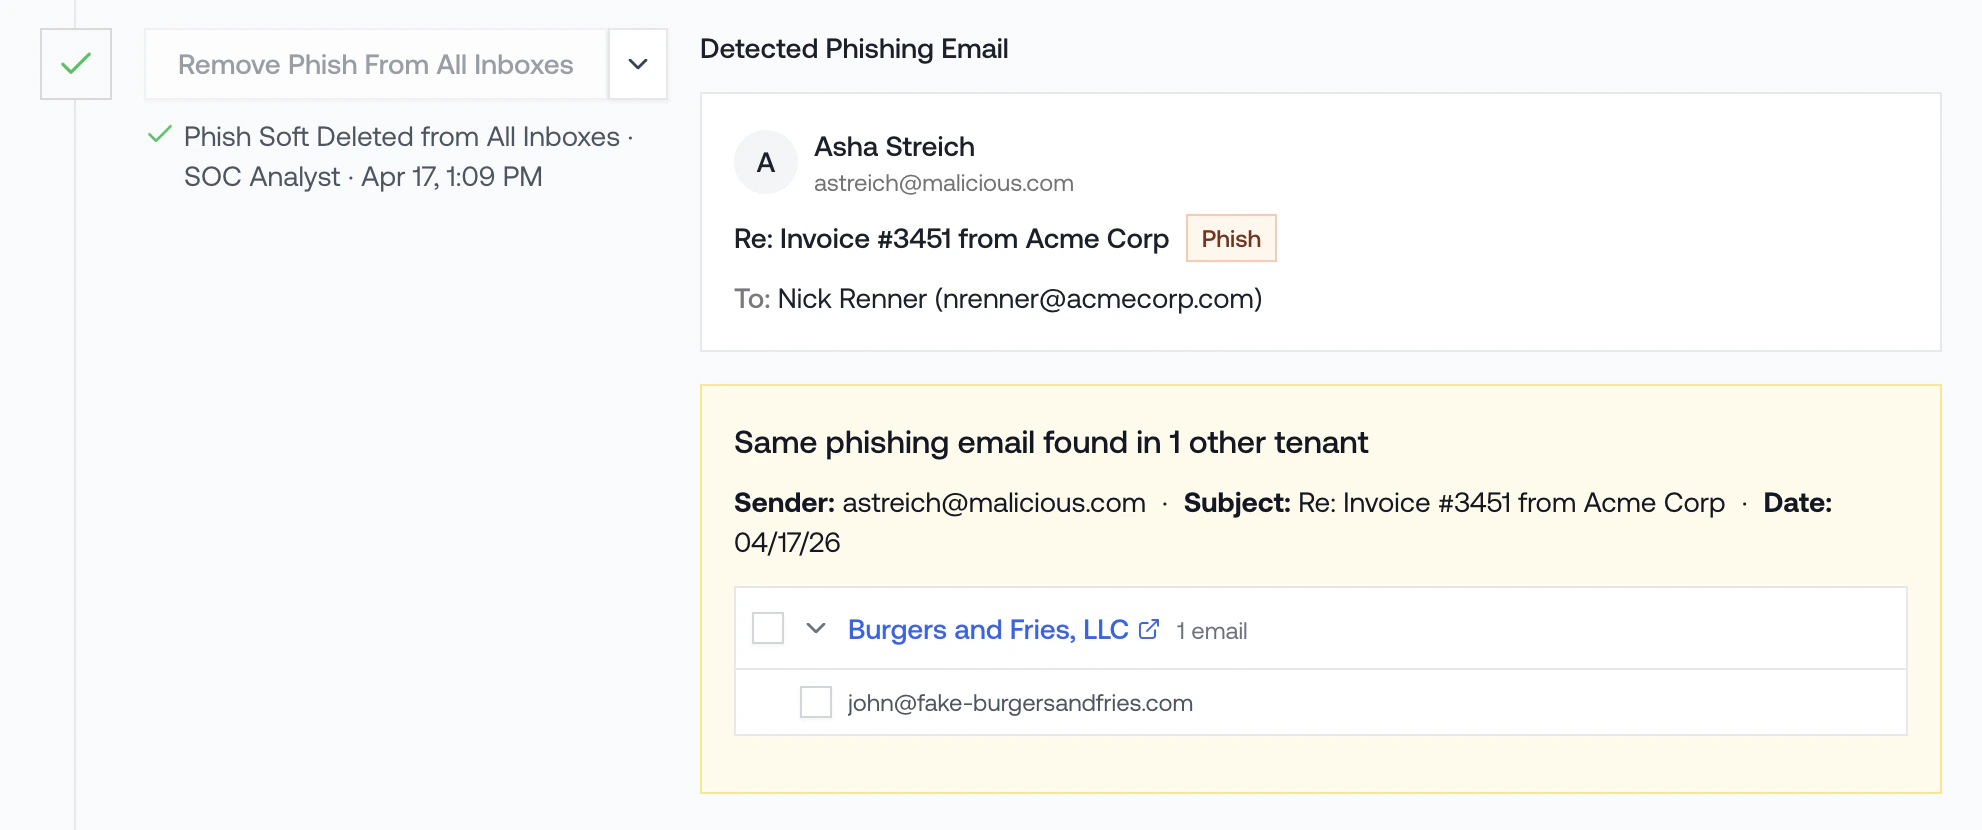
If you manage multiple tenants, Petra identifies matching phishing emails across all of your managed tenants and surfaces them in the **Cross-Tenant Phish** panel below the tagged phish in the incident's Remediation Actions panel. This panel shows each tenant where the same phish was found, along with the sender, subject, and affected mailboxes.
You can select individual emails or entire tenants for retraction. Clicking a tenant name opens that tenant's Email tab with the subject and sender filters pre-populated, so you can review before taking action.
#### Mark as Phish
Petra tags the phishing email on the incident automatically in most cases. When it can't, you'll need to tag it yourself so that retraction, cross-tenant search, and reporting know which email is the phish.
To tag manually: open the incident, find the suspicious email in the Exchange Logs, hover over it, and click **Mark as Phish**. The email will show a **Phish** badge next to the subject line once it's tagged.
**Mark as Phish** tags the email as the phishing email for the incident. It does not remove the email from inboxes. Use the retraction button in Step 2 to move it to Deleted Items across the tenant, or [Cross-Tenant Phish Removal](#cross-tenant-phish-retraction) for matching emails across other tenants.
#### Cross-tenant phish retraction
If you manage multiple tenants, Petra identifies matching phishing emails across all of your managed tenants and surfaces them in the **Cross-Tenant Phish** panel below the tagged phish in the incident's Remediation Actions panel. This panel shows each tenant where the same phish was found, along with the sender, subject, and affected mailboxes.
You can select individual emails or entire tenants for retraction. Clicking a tenant name opens that tenant's Email tab with the subject and sender filters pre-populated, so you can review before taking action.
 Spotted a phish in the wild that isn't tied to an incident and want to sweep it across every tenant you manage? See [Cross-Tenant Phish Removal](/docs/remediation/cross-tenant-phish-removal) for the proactive, ad hoc flow.
### Recover Emails Deleted by the Attacker
Attackers routinely delete emails to cover their tracks, hiding sent phishing emails, wiping replies from victims, or clearing sign-in notification emails from the compromised mailbox. Petra surfaces these deletions in the **Recover Deleted Emails** card of the Remediation Actions panel. The card is built from the incident's Exchange audit logs, so it covers deletions across the affected mailboxes tied to the incident, not only the primary compromised account.
Spotted a phish in the wild that isn't tied to an incident and want to sweep it across every tenant you manage? See [Cross-Tenant Phish Removal](/docs/remediation/cross-tenant-phish-removal) for the proactive, ad hoc flow.
### Recover Emails Deleted by the Attacker
Attackers routinely delete emails to cover their tracks, hiding sent phishing emails, wiping replies from victims, or clearing sign-in notification emails from the compromised mailbox. Petra surfaces these deletions in the **Recover Deleted Emails** card of the Remediation Actions panel. The card is built from the incident's Exchange audit logs, so it covers deletions across the affected mailboxes tied to the incident, not only the primary compromised account.
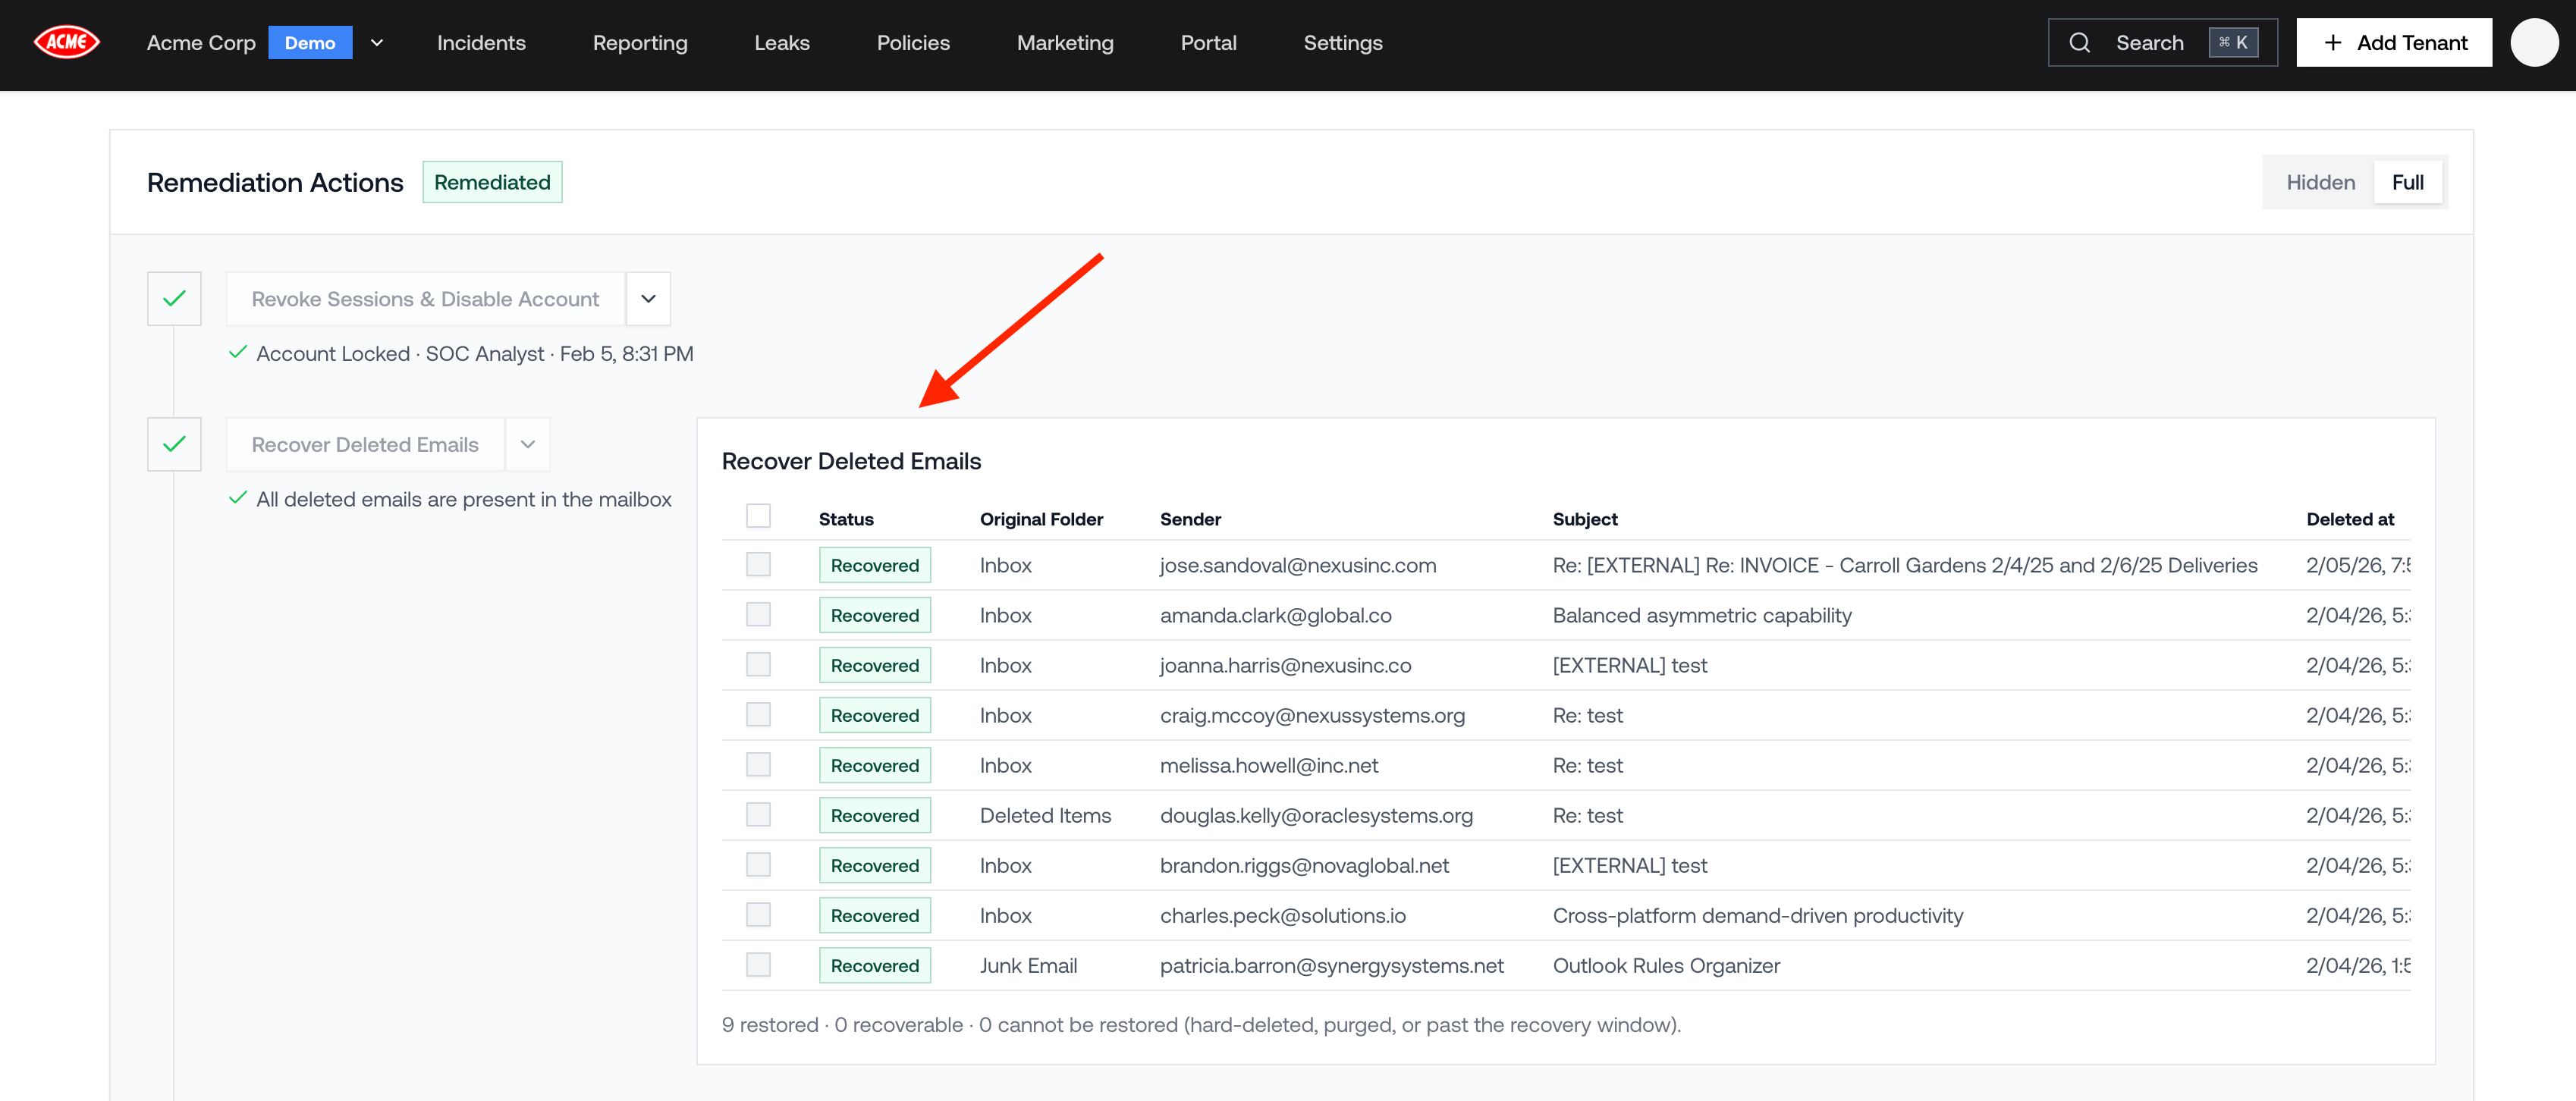 The card lists every attacker-attributed email deletion during the incident window, with the original folder, sender, subject, and when it was deleted. Each email has a status:
* **Restored**: the email is already back in the mailbox
* **Not restored**: the email is still recoverable (sitting in Deleted Items or the Recoverable Items folder)
* **Unrecoverable**: the email is gone for good
To recover, select individual emails and click **Recover Deleted Emails**, or use the dropdown to **Recover all to Inbox**. Recovered emails return to their original folder, or to the Inbox when you choose that option.
**Recover Deleted Emails** restores evidence; it does not remove attacker access. Always complete the access-ending steps (revoke sessions, lock the account, reset the password) first, then use recovery as part of the cleanup.
#### Why some emails cannot be restored
To understand recoverability, it helps to know how Exchange Online deletions work. A deleted email moves through a sequence of locations, and each step further along means less chance of getting it back:
1. **Deleted Items** (the trash folder). A normal delete lands here. Petra can recover emails from Deleted Items.
2. **Recoverable Items \ Deletions** (the "dumpster"). Emails land here when they're removed from Deleted Items explicitly, or when Deleted Items is emptied. Users can't see this folder, but the emails are still retrievable. Petra can recover these too.
3. **Recoverable Items \ Purges**. A hard delete (Shift+Delete / programmatic hard delete) goes straight here, skipping both previous folders, and anything removed from the dumpster is purged here as well. Emails in Purges can't be moved back into the mailbox by end users, admins, or Petra. The one exception: if the mailbox is on litigation hold or covered by a retention policy, purged items are preserved and can still be surfaced through eDiscovery, but that's legal-hold preservation, not restoration to the mailbox.
4. **Retention expiry**. Even the dumpster is time-limited: Exchange Online keeps soft-deleted items for 14 days by default (configurable up to 30 days in the tenant's retention settings). Once that window closes, the item is permanently removed.
With that in mind, an email shows as **Unrecoverable** in Petra when it falls into one of these cases:
* **Hard-deleted**: the attacker used a hard delete instead of a normal one, sending the email straight to Purges. Sophisticated attackers do this deliberately to destroy evidence.
* **Purged after a second deletion pass**: the email was soft-deleted normally, but was later removed from the dumpster, either manually by the attacker covering their tracks more thoroughly, or by automated mailbox clean-up (Managed Folder Assistant processing, quota pressure).
* **Past the recovery window**: the deletion happened long enough ago that the 14–30 day retrieval window has closed. This is common when an incident is investigated weeks after the fact.
* **Petra couldn't verify the email's location**: if Petra can't reach the mailbox (for example, missing or expired Microsoft permissions), it can't confirm where the email is and errs on the side of showing it as unrecoverable. Fix the permissions and the status may update to **Not restored** on the next check.
Unrecoverable emails can't be recovered by Petra or by Microsoft, but they still appear in the card, the incident timeline, and the incident PDF so you have a record of what the attacker destroyed.
### Step 3: Disable Persistence Mechanisms
Attackers often create persistence mechanisms to maintain access even after password changes. Petra identifies these mechanisms and lets you one-click disable them.
These include:
* Mail filter rules
* App registrations
* Service principals
* Malicious device registrations
* Phishing emails sent internally
* Phishing emails still in mailboxes in your environment
The card lists every attacker-attributed email deletion during the incident window, with the original folder, sender, subject, and when it was deleted. Each email has a status:
* **Restored**: the email is already back in the mailbox
* **Not restored**: the email is still recoverable (sitting in Deleted Items or the Recoverable Items folder)
* **Unrecoverable**: the email is gone for good
To recover, select individual emails and click **Recover Deleted Emails**, or use the dropdown to **Recover all to Inbox**. Recovered emails return to their original folder, or to the Inbox when you choose that option.
**Recover Deleted Emails** restores evidence; it does not remove attacker access. Always complete the access-ending steps (revoke sessions, lock the account, reset the password) first, then use recovery as part of the cleanup.
#### Why some emails cannot be restored
To understand recoverability, it helps to know how Exchange Online deletions work. A deleted email moves through a sequence of locations, and each step further along means less chance of getting it back:
1. **Deleted Items** (the trash folder). A normal delete lands here. Petra can recover emails from Deleted Items.
2. **Recoverable Items \ Deletions** (the "dumpster"). Emails land here when they're removed from Deleted Items explicitly, or when Deleted Items is emptied. Users can't see this folder, but the emails are still retrievable. Petra can recover these too.
3. **Recoverable Items \ Purges**. A hard delete (Shift+Delete / programmatic hard delete) goes straight here, skipping both previous folders, and anything removed from the dumpster is purged here as well. Emails in Purges can't be moved back into the mailbox by end users, admins, or Petra. The one exception: if the mailbox is on litigation hold or covered by a retention policy, purged items are preserved and can still be surfaced through eDiscovery, but that's legal-hold preservation, not restoration to the mailbox.
4. **Retention expiry**. Even the dumpster is time-limited: Exchange Online keeps soft-deleted items for 14 days by default (configurable up to 30 days in the tenant's retention settings). Once that window closes, the item is permanently removed.
With that in mind, an email shows as **Unrecoverable** in Petra when it falls into one of these cases:
* **Hard-deleted**: the attacker used a hard delete instead of a normal one, sending the email straight to Purges. Sophisticated attackers do this deliberately to destroy evidence.
* **Purged after a second deletion pass**: the email was soft-deleted normally, but was later removed from the dumpster, either manually by the attacker covering their tracks more thoroughly, or by automated mailbox clean-up (Managed Folder Assistant processing, quota pressure).
* **Past the recovery window**: the deletion happened long enough ago that the 14–30 day retrieval window has closed. This is common when an incident is investigated weeks after the fact.
* **Petra couldn't verify the email's location**: if Petra can't reach the mailbox (for example, missing or expired Microsoft permissions), it can't confirm where the email is and errs on the side of showing it as unrecoverable. Fix the permissions and the status may update to **Not restored** on the next check.
Unrecoverable emails can't be recovered by Petra or by Microsoft, but they still appear in the card, the incident timeline, and the incident PDF so you have a record of what the attacker destroyed.
### Step 3: Disable Persistence Mechanisms
Attackers often create persistence mechanisms to maintain access even after password changes. Petra identifies these mechanisms and lets you one-click disable them.
These include:
* Mail filter rules
* App registrations
* Service principals
* Malicious device registrations
* Phishing emails sent internally
* Phishing emails still in mailboxes in your environment
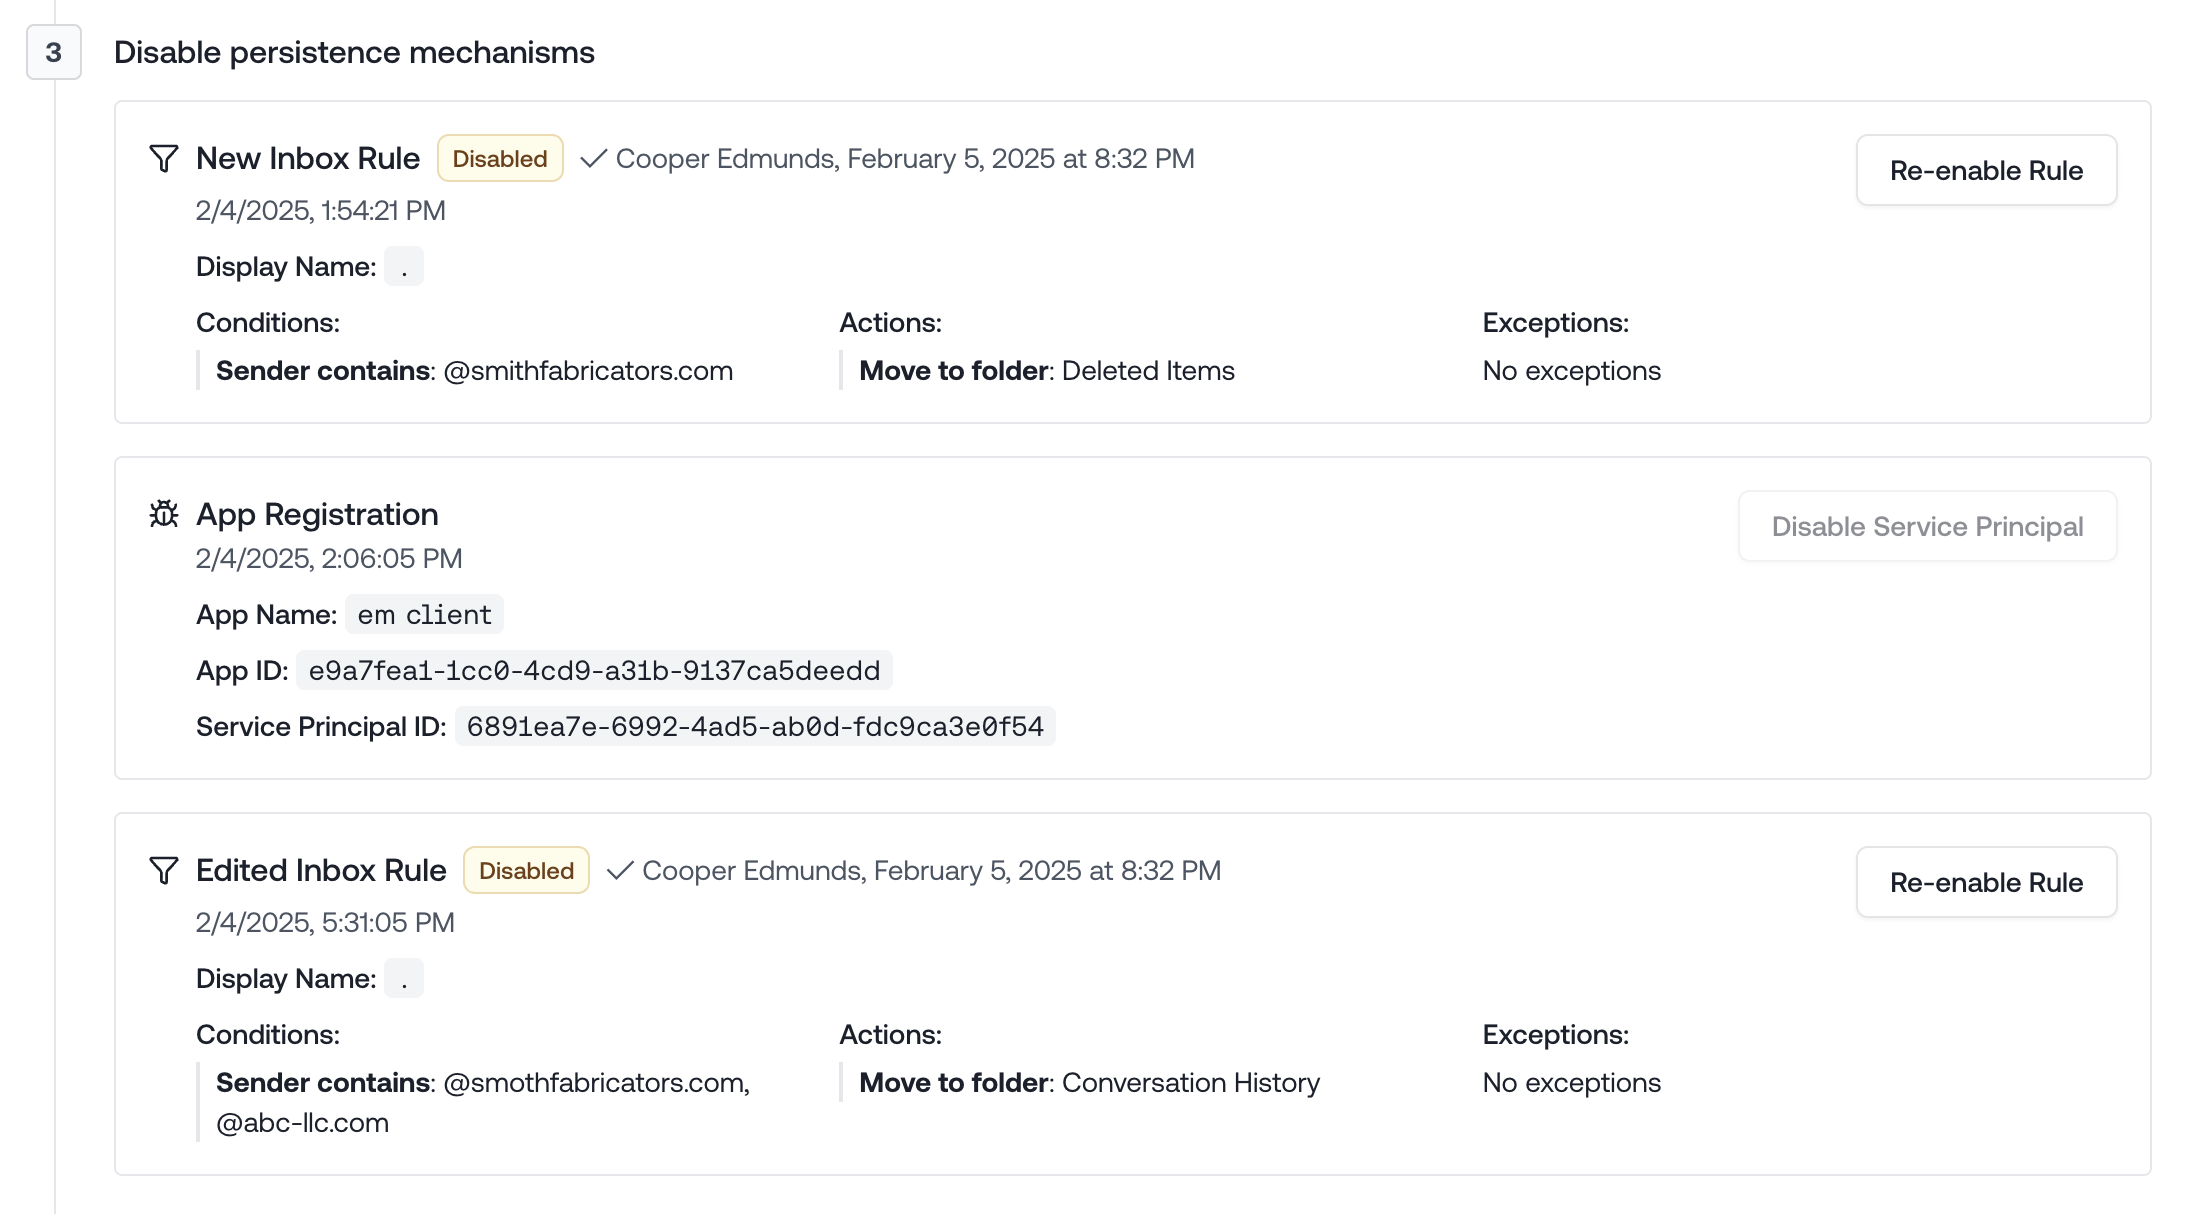 All of these persistence mechanisms are auto-identified and can be removed in one click. Use the
**Remediation Actions Panel** to remove them.
### Step 4: Reset Password
After removing all persistence mechanisms:
1. Click the "Reset Password" button. This will generate a new password string and apply it to the account. It will then show you that new password.
2. Communicate the new password securely to the user. We recommend calling them.
#### Password writeback for hybrid accounts
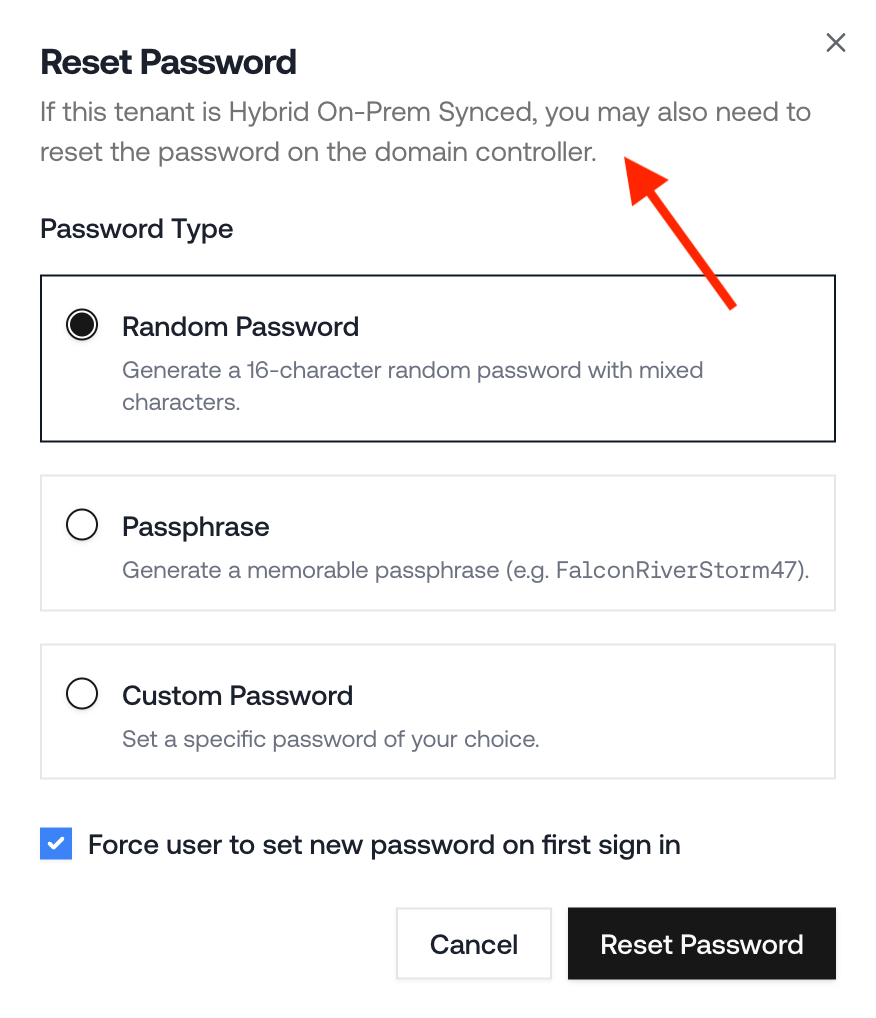
Resetting the password in Petra changes the password in Entra, not in the on-prem AD instance directly. Whether that's enough depends on the tenant's password writeback setting, which is configurable per tenant:
* **Writeback enabled**: the Entra password change syncs back to on-prem AD automatically. There's nothing else to do after this step.
* **Writeback disabled**: you also need to reset the password on the on-prem domain controller. That change syncs up to Entra on the next sync cycle.
To check the setting, go to **Entra > Password reset > On-premises integration** and look for **Enable password write back for synced users**. See Microsoft's [tutorial on enabling SSPR writeback](https://learn.microsoft.com/en-us/entra/identity/authentication/tutorial-enable-sspr-writeback) for more on toggling this setting.
Look for this message when resetting the password through Petra:
All of these persistence mechanisms are auto-identified and can be removed in one click. Use the
**Remediation Actions Panel** to remove them.
### Step 4: Reset Password
After removing all persistence mechanisms:
1. Click the "Reset Password" button. This will generate a new password string and apply it to the account. It will then show you that new password.
2. Communicate the new password securely to the user. We recommend calling them.
#### Password writeback for hybrid accounts
Resetting the password in Petra changes the password in Entra, not in the on-prem AD instance directly. Whether that's enough depends on the tenant's password writeback setting, which is configurable per tenant:
* **Writeback enabled**: the Entra password change syncs back to on-prem AD automatically. There's nothing else to do after this step.
* **Writeback disabled**: you also need to reset the password on the on-prem domain controller. That change syncs up to Entra on the next sync cycle.
To check the setting, go to **Entra > Password reset > On-premises integration** and look for **Enable password write back for synced users**. See Microsoft's [tutorial on enabling SSPR writeback](https://learn.microsoft.com/en-us/entra/identity/authentication/tutorial-enable-sspr-writeback) for more on toggling this setting.
Look for this message when resetting the password through Petra:
 ### Step 5: Re-enable Account
After resetting the password, you can re-enable the account.
For hybrid accounts, always clear a Petra lock using the **Re-enable Account** button on the incident page. Re-enabling the account on the on-prem domain controller will not clear the lock, and the account will stay disabled.
### Step 6: Mark as Remediated
Once all remediation steps are complete:
1. Click "Mark as Remediated"
2. This changes the incident status to "Remediated"
3. The remediation panel will auto-hide for cleaner viewing
## Post-Remediation
After remediation, the incident page remains available for:
* Generating incident reports
* Exporting data to share with clients
* Reviewing the incident timeline and details
* Further investigation if needed
You can always expand the remediation panel again if you need to review or modify any remediation
actions taken.
The Demo Tenant (Acme Corp) is a phenomenal place to see all of this in action.
### Step 5: Re-enable Account
After resetting the password, you can re-enable the account.
For hybrid accounts, always clear a Petra lock using the **Re-enable Account** button on the incident page. Re-enabling the account on the on-prem domain controller will not clear the lock, and the account will stay disabled.
### Step 6: Mark as Remediated
Once all remediation steps are complete:
1. Click "Mark as Remediated"
2. This changes the incident status to "Remediated"
3. The remediation panel will auto-hide for cleaner viewing
## Post-Remediation
After remediation, the incident page remains available for:
* Generating incident reports
* Exporting data to share with clients
* Reviewing the incident timeline and details
* Further investigation if needed
You can always expand the remediation panel again if you need to review or modify any remediation
actions taken.
The Demo Tenant (Acme Corp) is a phenomenal place to see all of this in action.